React 可以改變你對設計和應用程式建構的思考方式。當你使用 React 建構使用者介面時,你會先將它分解成稱為元件的部分。然後,你將描述每個元件的不同視覺狀態。最後,你將元件連接在一起,以便資料在它們之間流動。在本教學中,我們將引導你完成使用 React 建構可搜尋產品資料表的思考過程。
從模型開始
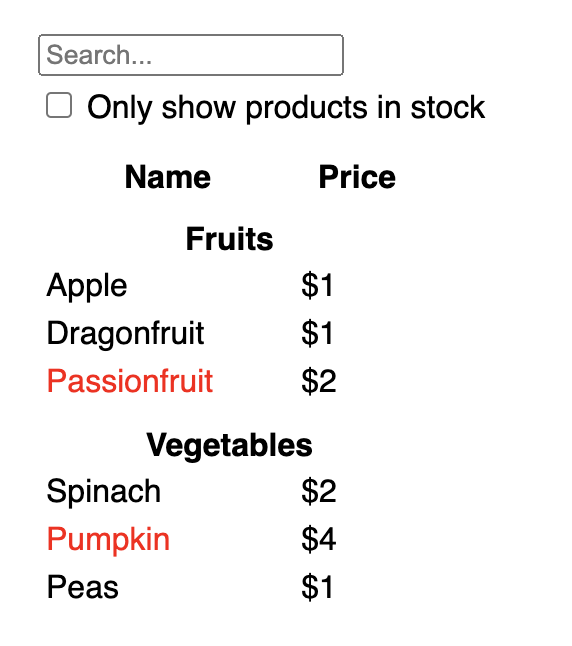
想像你已經有一個 JSON API 和一個設計師提供的模型。
JSON API 返回如下所示的一些資料:
[
  { category: "Fruits", price: "$1", stocked: true, name: "Apple" },
  { category: "Fruits", price: "$1", stocked: true, name: "Dragonfruit" },
  { category: "Fruits", price: "$2", stocked: false, name: "Passionfruit" },
  { category: "Vegetables", price: "$2", stocked: true, name: "Spinach" },
  { category: "Vegetables", price: "$4", stocked: false, name: "Pumpkin" },
  { category: "Vegetables", price: "$1", stocked: true, name: "Peas" }
]
模型如下所示:
要在 React 中實作 UI,你通常會遵循相同的五個步驟。
步驟 1:將 UI 分解成元件階層
首先,在模型中的每個元件和子元件周圍繪製方框,並為它們命名。如果你與設計師合作,他們可能已經在他們的設計工具中命名了這些元件。詢問他們!
根據你的背景,你可以用不同的方式思考如何將設計拆分成元件:
- 程式設計—使用相同的技術來決定是否應該建立新的函式或物件。其中一種技術是單一職責原則,即一個元件理想情況下應該只做一件事。如果它最終變得龐大,它應該被分解成更小的子元件。
- CSS—考慮你會為哪些元素建立類別選擇器。(然而,元件的粒度略低。)
- 設計—考慮你將如何組織設計的圖層。
如果你的 JSON 結構良好,你通常會發現它自然地對應到你 UI 的元件結構。這是因為 UI 和資料模型通常具有相同的資訊架構,也就是相同的形狀。將你的 UI 分成元件,其中每個元件匹配你資料模型的一部分。
此螢幕上有五個元件:

FilterableProductTable(灰色)包含整個應用程式。SearchBar(藍色)接收使用者輸入。ProductTable(淡紫色)根據使用者輸入顯示和篩選列表。ProductCategoryRow(綠色)為每個類別顯示一個標題。ProductRow(黃色)為每個產品顯示一行。
如果你查看 ProductTable(淡紫色),你會看到表格標題(包含「名稱」和「價格」標籤)並不是它自己的元件。這是一個偏好問題,你可以選擇任何一種方式。在此範例中,它是 ProductTable 的一部分,因為它出現在 ProductTable 的列表內。但是,如果這個標題變得複雜(例如,如果你新增排序),你可以將它移到它自己的 ProductTableHeader 元件中。
現在你已經在模型中識別了元件,將它們排列成階層結構。在模型中出現於另一個元件內的元件應該在階層結構中顯示為子元件:
FilterableProductTableSearchBarProductTableProductCategoryRowProductRow
步驟二:在 React 中構建靜態版本
現在您已經有了元件階層,是時候實作您的應用程式了。最直接的方法是構建一個版本,該版本可以根據您的數據模型渲染 UI,而無需添加任何互動性……目前!通常先構建靜態版本,然後再添加互動性會更容易。構建靜態版本需要大量的輸入,但不需要思考,而添加互動性則需要大量的思考,而不需要大量的輸入。
要構建渲染數據模型的應用程式靜態版本,您需要構建可重複使用其他元件並使用元件 屬性 (props) 傳遞數據的元件。屬性是一種將數據從父級傳遞到子級的方法。(如果您熟悉狀態 (state) 的概念,請不要使用狀態來構建此靜態版本。狀態僅保留用於互動性,即隨時間變化的數據。由於這是應用程式的靜態版本,因此您不需要它。)
您可以通過從階層結構中較高的元件(例如 FilterableProductTable)開始構建“由上而下”,或者通過從較低的元件(例如 ProductRow)開始構建“由下而上”。在更簡單的示例中,通常更容易自上而下,而在較大的項目中,更容易自下而上。
function ProductCategoryRow({ category }) {
  return (
    <tr>
      <th colSpan="2">
        {category}
      </th>
    </tr>
  );
}

function ProductRow({ product }) {
  const name = product.stocked ? product.name :
    <span style={{ color: 'red' }}>
      {product.name}
    </span>;

  return (
    <tr>
      <td>{name}</td>
      <td>{product.price}</td>
    </tr>
  );
}

function ProductTable({ products }) {
  const rows = [];
  let lastCategory = null;

  products.forEach((product) => {
    if (product.category !== lastCategory) {
      rows.push(
        <ProductCategoryRow
          category={product.category}
          key={product.category} />
      );
    }
    rows.push(
      <ProductRow
        product={product}
        key={product.name} />
    );
    lastCategory = product.category;
  });

  return (
    <table>
      <thead>
        <tr>
          <th>Name</th>
          <th>Price</th>
        </tr>
      </thead>
      <tbody>{rows}</tbody>
    </table>
  );
}

function SearchBar() {
  return (
    <form>
      <input type="text" placeholder="Search..." />
      <label>
        <input type="checkbox" />
        {' '}
        Only show products in stock
      </label>
    </form>
  );
}

function FilterableProductTable({ products }) {
  return (
    <div>
      <SearchBar />
      <ProductTable products={products} />
    </div>
  );
}

const PRODUCTS = [
  {category: "Fruits", price: "$1", stocked: true, name: "Apple"},
  {category: "Fruits", price: "$1", stocked: true, name: "Dragonfruit"},
  {category: "Fruits", price: "$2", stocked: false, name: "Passionfruit"},
  {category: "Vegetables", price: "$2", stocked: true, name: "Spinach"},
  {category: "Vegetables", price: "$4", stocked: false, name: "Pumpkin"},
  {category: "Vegetables", price: "$1", stocked: true, name: "Peas"}
];

export default function App() {
  return <FilterableProductTable products={PRODUCTS} />;
}
(如果這段程式碼看起來很嚇人,請先瀏覽快速入門!)
構建元件後,您將擁有一個可渲染數據模型的可重複使用元件庫。由於這是一個靜態應用程式,因此元件將只返回 JSX。階層結構頂部的元件(FilterableProductTable)將您的數據模型作為屬性。這稱為*單向數據流*,因為數據從頂級元件向下流到樹底部的元件。
步驟三:找到 UI 狀態的最小但完整表示
要使 UI 具有互動性,您需要讓使用者更改您的基礎數據模型。您將使用*狀態*來實現此目的。
將狀態視為您的應用程式需要記住的最小變化數據集。構建狀態的最重要原則是保持DRY(不要重複自己)。找出您的應用程式所需的絕對最小狀態表示形式,並按需計算其他所有內容。例如,如果您正在構建購物清單,您可以將商品作為陣列存儲在狀態中。如果您還想顯示清單中的商品數量,請不要將商品數量存儲為另一個狀態值,而是讀取陣列的長度。
現在想想這個範例應用程式中的所有數據
- 產品的原始清單
- 使用者輸入的搜尋文字
- 核取方塊的值
- 過濾後的產品清單
哪些是狀態?找出哪些不是
- 它是否隨著時間的推移保持不變?如果是這樣,它就不是狀態。
- 它是通過屬性從父級傳入的嗎?如果是這樣,它就不是狀態。
- 您可以根據元件中現有的狀態或屬性計算它嗎?如果是這樣,它*絕對*不是狀態!
剩下的可能是狀態。
讓我們再次逐一檢查它們
- 產品的原始清單作為屬性傳入,因此它不是狀態。
- 搜尋文字似乎是狀態,因為它會隨著時間而改變,並且無法從任何東西計算出來。
- 核取方塊的值似乎是狀態,因為它會隨著時間而改變,並且無法從任何東西計算出來。
- 過濾後的產品清單不是狀態,因為它可以通過獲取產品的原始清單並根據搜尋文字和核取方塊的值進行過濾來計算。
這表示只有搜尋文字和核取方塊的值才是狀態!做得好!
深入探討
React 中有兩種「模型」數據:屬性和狀態。兩者非常不同
- 屬性就像您傳遞給函數的參數一樣。它們允許父元件將數據傳遞給子元件並自訂其外觀。例如,
Form可以將color屬性傳遞給Button。 - 狀態就像元件的記憶體一樣。 它允許元件跟踪某些資訊並根據互動更改它。例如,
Button可以跟踪isHovered狀態。
屬性和狀態不同,但它們可以一起使用。父元件通常會在狀態中保留一些資訊(以便它可以更改它),並將其*向下傳遞*給子元件作為其屬性。如果在第一次閱讀時差異仍然模糊不清,也沒關係。要真正理解它需要一些練習!
步驟四:確定您的狀態應該在哪裡
確定應用程式的最小狀態數據後,您需要確定哪個元件負責更改此狀態,或者哪個元件*擁有*該狀態。請記住:React 使用單向數據流,將數據從父元件向下傳遞到子元件。哪個元件應該擁有哪個狀態可能並不立即清楚。如果您是這個概念的新手,這可能會很有挑戰性,但您可以按照以下步驟來解決!
對於應用程式中的每個狀態
- 找出*每個*基於該狀態渲染某些內容的元件。
- 找到它們最接近的共同父元件 - 階層結構中位於它們上方的元件
- 決定狀態應該在哪裡
- 通常,您可以將狀態直接放入它們的共同父元件中。
- 您也可以將狀態放入它們的共同父元件上方的某些元件中。
- 如果您找不到適合擁有狀態的元件,請創建一個專門用於保存狀態的新元件,並將其添加到階層結構中共同父元件上方的某個位置。
在上一步中,您在此應用程式中找到了兩個狀態:搜尋輸入文字和核取方塊的值。在此範例中,它們始終一起出現,因此將它們放在同一個位置是有意義的。
現在讓我們來看看它們的策略
- 找出使用狀態的元件
ProductTable需要根據該狀態(搜尋文字和核取方塊值)過濾產品清單。SearchBar需要顯示該狀態(搜尋文字和核取方塊值)。
- 找到它們的共同父組件:兩個組件共同擁有的第一個父組件是
FilterableProductTable。 - 決定狀態存放的位置:我們將在
FilterableProductTable中保存過濾文字和核取狀態值。
因此,狀態值將存放在 FilterableProductTable 中。
使用 useState() Hook 將狀態添加到組件中。Hook 是一種特殊的函式,讓您可以「鉤入」React。在 FilterableProductTable 的頂部添加兩個狀態變數,並指定它們的初始狀態。
function FilterableProductTable({ products }) {
  const [filterText, setFilterText] = useState('');
  const [inStockOnly, setInStockOnly] = useState(false);
然後,將 filterText 和 inStockOnly 作為屬性傳遞給 ProductTable 和 SearchBar。
<div>
  <SearchBar
    filterText={filterText}
    inStockOnly={inStockOnly} />
  <ProductTable
    products={products}
    filterText={filterText}
    inStockOnly={inStockOnly} />
</div>
您可以開始觀察您的應用程式將如何運作。在下面的沙盒程式碼中,將 filterText 的初始值從 useState('') 修改為 useState('fruit')。您將看到搜尋輸入文字和表格都會更新。
import { useState } from 'react';

function FilterableProductTable({ products }) {
  const [filterText, setFilterText] = useState('');
  const [inStockOnly, setInStockOnly] = useState(false);

  return (
    <div>
      <SearchBar
        filterText={filterText}
        inStockOnly={inStockOnly} />
      <ProductTable
        products={products}
        filterText={filterText}
        inStockOnly={inStockOnly} />
    </div>
  );
}

function ProductCategoryRow({ category }) {
  return (
    <tr>
      <th colSpan="2">
        {category}
      </th>
    </tr>
  );
}

function ProductRow({ product }) {
  const name = product.stocked ? product.name :
    <span style={{ color: 'red' }}>
      {product.name}
    </span>;

  return (
    <tr>
      <td>{name}</td>
      <td>{product.price}</td>
    </tr>
  );
}

function ProductTable({ products, filterText, inStockOnly }) {
  const rows = [];
  let lastCategory = null;

  products.forEach((product) => {
    if (
      product.name.toLowerCase().indexOf(
        filterText.toLowerCase()
      ) === -1
    ) {
      return;
    }
    if (inStockOnly && !product.stocked) {
      return;
    }
    if (product.category !== lastCategory) {
      rows.push(
        <ProductCategoryRow
          category={product.category}
          key={product.category} />
      );
    }
    rows.push(
      <ProductRow
        product={product}
        key={product.name} />
    );
    lastCategory = product.category;
  });

  return (
    <table>
      <thead>
        <tr>
          <th>Name</th>
          <th>Price</th>
        </tr>
      </thead>
      <tbody>{rows}</tbody>
    </table>
  );
}

function SearchBar({ filterText, inStockOnly }) {
  return (
    <form>
      <input
        type="text"
        value={filterText}
        placeholder="Search..."/>
      <label>
        <input
          type="checkbox"
          checked={inStockOnly} />
        {' '}
        Only show products in stock
      </label>
    </form>
  );
}

const PRODUCTS = [
  {category: "Fruits", price: "$1", stocked: true, name: "Apple"},
  {category: "Fruits", price: "$1", stocked: true, name: "Dragonfruit"},
  {category: "Fruits", price: "$2", stocked: false, name: "Passionfruit"},
  {category: "Vegetables", price: "$2", stocked: true, name: "Spinach"},
  {category: "Vegetables", price: "$4", stocked: false, name: "Pumpkin"},
  {category: "Vegetables", price: "$1", stocked: true, name: "Peas"}
];

export default function App() {
  return <FilterableProductTable products={PRODUCTS} />;
}
請注意,編輯表單目前還無法正常運作。上面的沙盒中有一個控制台錯誤,解釋了原因。
在上面的沙盒中,ProductTable 和 SearchBar 讀取 filterText 和 inStockOnly 屬性來呈現表格、輸入框和核取方塊。例如,以下是 SearchBar 填充輸入值的方式。
function SearchBar({ filterText, inStockOnly }) {
  return (
    <form>
      <input
        type="text"
        value={filterText}
        placeholder="Search..."/>
但是,您還沒有添加任何程式碼來回應使用者操作,例如輸入。這將是您的最後一步。
步驟 5:添加反向資料流 ...
目前,您的應用程式可以透過屬性和狀態向下傳遞來正確呈現。但是要根據使用者輸入更改狀態,您需要支援反向資料流:階層結構深處的表單組件需要更新 FilterableProductTable 中的狀態。
React 使這個資料流變得明確,但它比雙向資料繫結需要更多程式碼。如果您嘗試在上面的範例中輸入或勾選方塊,您會看到 React 忽略了您的輸入。這是故意的。透過撰寫 <input value={filterText} />,您已將 input 的 value` 屬性設定為始終等於從 FilterableProductTable 傳入的 filterText 狀態。由於 filterText 狀態永遠不會被設定,因此輸入永遠不會改變。
您希望每當使用者更改表單輸入時,狀態都會更新以反映這些更改。狀態由 FilterableProductTable 擁有,因此只有它可以呼叫 setFilterText 和 setInStockOnly。要讓 SearchBar 更新 FilterableProductTable 的狀態,您需要將這些函式向下傳遞給 SearchBar。
function FilterableProductTable({ products }) {
  const [filterText, setFilterText] = useState('');
  const [inStockOnly, setInStockOnly] = useState(false);

  return (
    <div>
      <SearchBar
        filterText={filterText}
        inStockOnly={inStockOnly}
        onFilterTextChange={setFilterText}
        onInStockOnlyChange={setInStockOnly} />
在 SearchBar 內部,您將添加 onChange 事件處理程式,並從中設定父組件的狀態。
function SearchBar({
  filterText,
  inStockOnly,
  onFilterTextChange,
  onInStockOnlyChange
}) {
  return (
    <form>
      <input
        type="text"
        value={filterText}
        placeholder="Search..."
        onChange={(e) => onFilterTextChange(e.target.value)}
      />
      <label>
        <input
          type="checkbox"
          checked={inStockOnly}
          onChange={(e) => onInStockOnlyChange(e.target.checked)}
現在應用程式可以完整運作了!
import { useState } from 'react';

function FilterableProductTable({ products }) {
  const [filterText, setFilterText] = useState('');
  const [inStockOnly, setInStockOnly] = useState(false);

  return (
    <div>
      <SearchBar
        filterText={filterText}
        inStockOnly={inStockOnly}
        onFilterTextChange={setFilterText}
        onInStockOnlyChange={setInStockOnly} />
      <ProductTable
        products={products}
        filterText={filterText}
        inStockOnly={inStockOnly} />
    </div>
  );
}

function ProductCategoryRow({ category }) {
  return (
    <tr>
      <th colSpan="2">
        {category}
      </th>
    </tr>
  );
}

function ProductRow({ product }) {
  const name = product.stocked ? product.name :
    <span style={{ color: 'red' }}>
      {product.name}
    </span>;

  return (
    <tr>
      <td>{name}</td>
      <td>{product.price}</td>
    </tr>
  );
}

function ProductTable({ products, filterText, inStockOnly }) {
  const rows = [];
  let lastCategory = null;

  products.forEach((product) => {
    if (
      product.name.toLowerCase().indexOf(
        filterText.toLowerCase()
      ) === -1
    ) {
      return;
    }
    if (inStockOnly && !product.stocked) {
      return;
    }
    if (product.category !== lastCategory) {
      rows.push(
        <ProductCategoryRow
          category={product.category}
          key={product.category} />
      );
    }
    rows.push(
      <ProductRow
        product={product}
        key={product.name} />
    );
    lastCategory = product.category;
  });

  return (
    <table>
      <thead>
        <tr>
          <th>Name</th>
          <th>Price</th>
        </tr>
      </thead>
      <tbody>{rows}</tbody>
    </table>
  );
}

function SearchBar({
  filterText,
  inStockOnly,
  onFilterTextChange,
  onInStockOnlyChange
}) {
  return (
    <form>
      <input
        type="text"
        value={filterText} placeholder="Search..."
        onChange={(e) => onFilterTextChange(e.target.value)} />
      <label>
        <input
          type="checkbox"
          checked={inStockOnly}
          onChange={(e) => onInStockOnlyChange(e.target.checked)} />
        {' '}
        Only show products in stock
      </label>
    </form>
  );
}

const PRODUCTS = [
  {category: "Fruits", price: "$1", stocked: true, name: "Apple"},
  {category: "Fruits", price: "$1", stocked: true, name: "Dragonfruit"},
  {category: "Fruits", price: "$2", stocked: false, name: "Passionfruit"},
  {category: "Vegetables", price: "$2", stocked: true, name: "Spinach"},
  {category: "Vegetables", price: "$4", stocked: false, name: "Pumpkin"},
  {category: "Vegetables", price: "$1", stocked: true, name: "Peas"}
];

export default function App() {
  return <FilterableProductTable products={PRODUCTS} />;
}
您可以在「新增互動性」章節中學習所有關於處理事件和更新狀態的知識。
接下來 ...
這是一個關於如何使用 React 構建組件和應用程式的簡短介紹。您可以立即開始一個 React 專案,或者深入了解本教學中使用的所有語法。